
The very essence of the Web is communication, and as a system of mass communication, it does the job admirably. Until now, most Web pages inadequately communicated on a one-to-one basis with the individual user, employing one of two methods for sending messages. First, you could hard-code the information into the HTML text of the Web page-the sort of "one size fits all" approach that is indicative of other mass media such as TV and print. Second, you could present the message in a completely new page that must be downloaded from the server for each particular visitor, taking time and wasting bandwidth.
As a computer-based media, the Web has a unique opportunity that is not available to other forms of mass media. You can instantly gear communication to the individual-or to be more precise, you can give the appearance of such. Active content, whether it's in the form of Java applets, ActiveX controls, or active scripting, gives you the opportunity to present Web pages that are flexible and fast and give the impression of a one-to-one dialog with the visitor.
This chapter introduces you to some very straightforward VBScript methods that help improve the way your Web page communicates with the user and increase the speed with which this is achieved. In these days of 200Mhz Pentium chips that process a full year's trading accounts five seconds before you've even pressed a button, Web users have expectations of processing speeds far beyond what the Web currently provides. Many users are frustrated by the length of time it takes just to complete a simple form to the satisfaction of the webmaster. Furthermore, the Web has as many different user interfaces as it has Web sites; you should not underestimate the advantage of providing a familiar interface when it comes to helping users get the most from your Web site as quickly as possible.
The methods and procedures you'll see in this chapter add a more Windows-type look and feel to your Web pages by presenting the user with familiar Windows dialog boxes and messages. VBScript and active content browsers such as Microsoft Internet Explorer 3.0 provide several built-in methods for displaying Windows-type dialog boxes, which include the following:
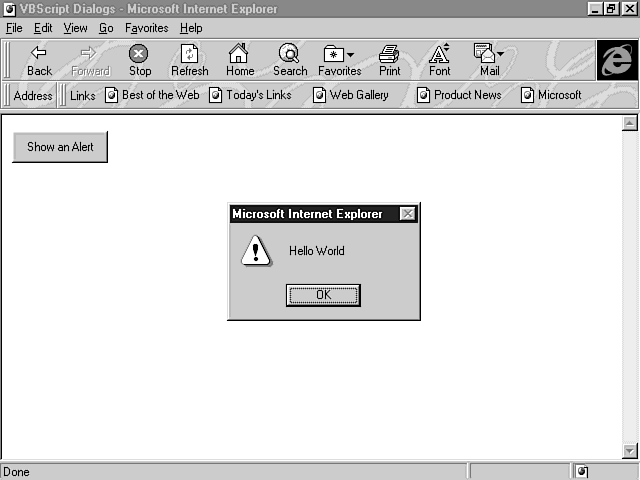
Figure 3.1 : An Alert dialog box.
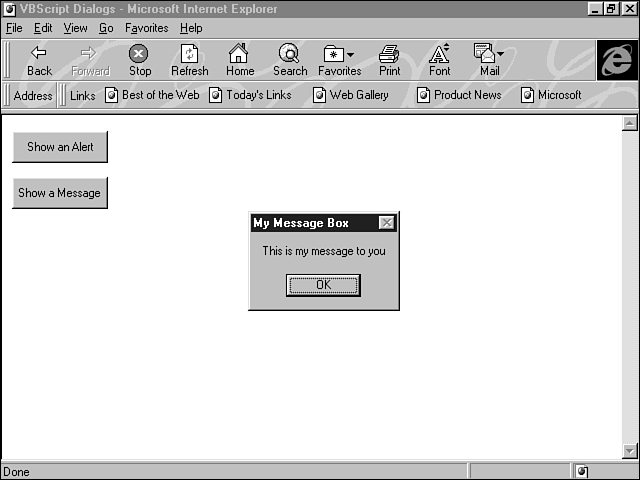
Figure 3.2 : A message dialog box.
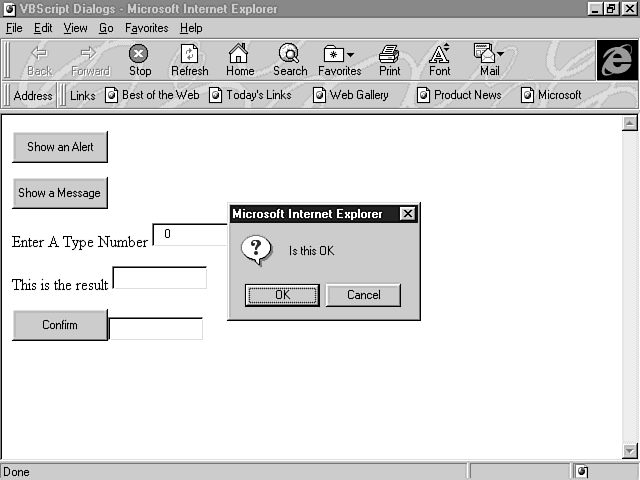
Figure 3.3 : A Confirm dialog box.
Figure 3.4 : A Prompt dialog box.
Figure 3.5 : A Custom Input dialog box.
Now that you know about the dialog boxes, I want you to use them. The examples you will see are all based on a single HTML document, using an ActiveX button to generate the event that calls the particular dialog box. You can also use an HTML button, such as Submit. The document that you create can serve as a sort of help file of dialog boxes that you can refer to later to check out how each dialog works and experiment with its implementation.
The Alert box provides a simple, straightforward method of displaying information to the user. There is no decision-making process for the user. The Alert box contains one OK button; to clear the box, the user simply clicks the button. You can use the Alert box to tell the user quick and straightforward facts, such as, "Hey, you didn't fill in the ZIP code," or other friendly remarks. The Alert box is as easy to include in your script as it is for the visitor to use. One simple line of code is all it takes, and because the Alert box returns no value, there is no need for further processing when the Alert box is closed.
Open the ActiveX Control Pad containing the nice, fresh, default HTML template. Add an ActiveX button as follows:
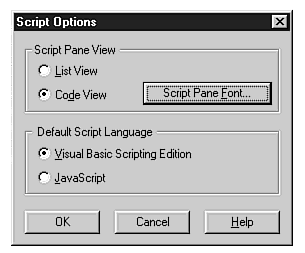
Before you start the Script Wizard, change one of the default settings in the Control Pad, which will save you a lot of time and trouble later. Change the code window default to Code View rather than the standard default of List View. When the code window of the Script Wizard is in List View, you are not allowed to select certain methods and link them to events, which rather defeats the object of the exercise. To change the default, perform the following steps:
Figure 3.6 : The Script Options dialog box.
Start the Script Wizard by either clicking the Script button or selecting Script Wizard from the Tools menu.
With the following procedure, you create an event handler for the click event of the button you just added to the page, which displays an Alert box to the user:
Just before you save the HTML file, give it a title of VBScript Dialogs and make the background of the page white. Save the file as dialogs.htm.
Run the file with the browser, as shown in Figure 3.7. When the Alert box is showing, you cannot access the rest of the browser until you clear the Alert box by clicking OK. This obviously stops the user from simply ignoring the dialog box. Furthermore, any script that follows the Alert method does not execute until the user clicks OK and thereby passes control back to the browser or, in this case, the subroutine that originally called the Alert box.
Figure 3.7 : The first stage of your dialogs sample, the Alert box.
As you have seen, the Alert method is both easy and quick to use; however, you do have another way to generate an Alert box, and it's a method that allows you to specify your own title.
The message box is quite different from most of the other dialogs you will see in this chapter in that it is not a direct method of the window object. It is, in fact, a function built into VBScript and a direct descendant of its VBA and Visual Basic brethren. Because of this, the message box gives you the greatest flexibility, but at the same time, it requires slightly more thought when you create it.
For this part of the dialogs Web page, you need to add another command button. If dialog.htm isn't open in the ActiveX Control Panel, open it and follow these steps:
The VBScript function you use to generate a message box on-screen is MsgBox. The MsgBox function has several elements within parentheses following the function name:
x = MsgBox(MessageText,Type,Title)
To add the MsgBox function to the CommandButton2, start the Script Wizard (which you know how to do by now) and perform the following steps:
Figure 3.8 : The second step, a simple message box.
| Note |
For those of you with experience in either VBA or Visual Basic, please note that certain functions, such as MsgBox, appear on the surface to be direct replications. However, you'll usually find some minor differences; for example, the Type variable in MsgBox is not optional in VBScript, whereas it is optional in Visual Basic and VBA. |
Apart from the capability to specify a title for your message box, you'll notice little difference between using a message box in this way and using the Alert method. The real power of MsgBox lies in its Type element, as you're about to see.
Using MsgBox enables you to add fully functional Windows dialog boxes, the likes of which you have probably never seen in a Web page before. Furthermore, unlike the built-in Alert and Confirm methods, MsgBox lets you use a wide combination of buttons. The return value from MsgBox determines which button the user pressed. You can also specify which of the buttons is the default button when the dialog box appears-that is, which button has the focus. All this functionality is very easy to tap by simply setting the Type variable of the MsgBox function.
You choose the Type variable, which is numeric, by adding
three numbers together: the Button type, the Icon type, and the
Default Button type. Table 3.1 shows the values for each of the
types.
| Type Value | Meaning |
| Button Types | |
| Display OK button only | |
| Display OK and Cancel buttons | |
| Display Abort, Retry, and Ignore buttons | |
| Display Yes, No, and Cancel buttons | |
| Display Yes and No buttons | |
| Display Retry and Cancel buttons | |
| Icon Types | |
| No icon | |
| Display Stop icon | |
| Display Question mark icon | |
| Display Exclamation mark icon | |
| Display Information icon | |
| Default Button Types | |
| First button has focus | |
| Second button has focus | |
| Third button has focus | |
By adding one number from each of the three types, you can generate a wide range of different message boxes to suit almost every need.
To create a message box with Yes, No, and Cancel Buttons (3); a Question mark icon (32); and the No button (the second button, in this case) as the default (256), you set the MsgBox Type variable to 3 + 32 + 256 = 291.
To determine which button the user pressed, you examine the numeric
variable of the return value, which is described in Table 3.2.
| Button Clicked | |
| OK | |
| Cancel | |
| Abort | |
| Retry | |
| Ignore | |
| Yes | |
| No |
Now, create an example that allows you to create any combination of types for the MsgBox dialog and determine which button was clicked. For this example, you continue working with the dialogs.htm file created earlier in the chapter. You add two text boxes to the page. The first text box is used for entering the value of the Type variable, and the second text box displays the return value of the message box.
You then amend the code for the CommandButton2 event handler to take the value from the first text box, convert it from a string to a number, and use it within the MsgBox function. Display the return value of the MsgBox function in the second text box-easy!
Open the file dialogs.htm in your ActiveX Control Pad, and to add the two new text boxes, execute the following steps:
For the second text box, follow these steps:
To edit the script you created earlier, find the event handler for CommandButton2. Two lines above this is a <SCRIPT LANGUAGE=VBScript> tag. To the left of this tag in the margin is a script icon; click the icon to launch the Script Wizard and load the script for CommandButton2. Make the following changes to the script:
Your completed code section should now look like the one in Figure 3.9.
Figure 3.9 : The code to generate any combination of custom message box types.
As always, click OK to generate the code, save the file, and run it with your browser, as shown in Figure 3.10. You can spend hours of fun generating any combination of message box types simply by entering a number in the first text box and clicking the button. The return value of the button you click on the message box is echoed in the second text box. Remember, Type numbers are generated by totalling the three numbers for each type section.
Figure 3.10: dialogs.htm in the browser.
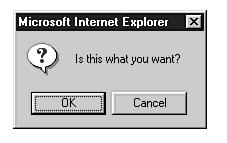
A simplified version of the message box, complete with Question mark icon and OK and Cancel buttons (analogous with MsgBox Type 33), is built into the browser's window object and accessed with the Confirm method. Whereas the MsgBox function returns a number based on the button type that was selected, the Confirm method returns True if the OK button was clicked and False if the Cancel button was clicked.
To test the Confirm method, add another button and text box to the dialogs.htm file. The button invokes the Confirm method, and the text box displays the result of the user's action. To add this functionality, perform the following steps:
Your Script Wizard window should look like the one in Figure 3.11.
Figure 3.11: The code for the confirm method in the ScriptWizard.
What you did is invoke the window object's Confirm method. When the user clicks CommandButton3, the Confirm dialog displays the message, Is this OK. The variable x stores the return value for the button that was clicked. The return value x then displays in TextBox3.
Click OK, save the file, and run it with the browser, as shown in Figure 3.12.
Figure 3.12: The Confirm dialog box at work.
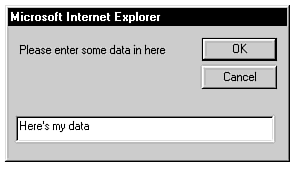
Dialog boxes can be useful for passing messages and information to the user, but what about information flow in the other direction? The next example shows you how to use the built-in Prompt method to take data input from the user of your Web page.
What you construct in this section is actually not a full links page, nor is it a complete add-your-own system. The idea of this section is to show you how you can utilize the Prompt method to obtain input from the user. Completing an add-your-own links page requires some server-side scripting in which you must construct a device for storing the user input and then displaying all the links when they're required. Server-side scripts are also discussed in Chapter 6 "Checking Form Data."
The Prompt method is ideal for taking input from the user in situations where you have limited real estate on the particular Web page or you don't want to involve the user in loading a fresh page. Straight from the current page, you can take inputs without a text box in sight, so at the same time, the Prompt method improves the look of your page. As a result, you can build many different forms into a Web page using the Prompt method without cluttering the page.
The page you will create contains an HTML form. Wait a minute! I know I said the Prompt dialog was going to replace forms, but this example is a little different because all the fields are hidden. You have to use an HTML form at some stage to transfer the information from the Web page to the server. The data that comes from the Prompt dialog box is copied by the script into the relevant hidden field of the form; the user is never aware that a form exists on the page. When all the doing is done, you can programmatically submit the form to the server.
Get to work on creating the front end to your new interactive links page. Open the ActiveX Control Pad, and using the default page one template, create the top section of the HTML in this way:
<HTML>
<HEAD>
<TITLE>My Links Page</TITLE>
</HEAD>
<BODY BGColor="white">
<CENTER>
 <H2>Interactive Links to Cool Places</H2>
    <FORM ACTION="" METHOD="POST" NAME="form1">
        <INPUT TYPE=hidden NAME="lnkTitle">
        <INPUT TYPE=hidden NAME="lnkURL">
        <INPUT TYPE=hidden NAME="lnkDesc">
    </FORM>
This exercise leaves the Action element blank. I used a POST method, but you can use GET if it's required by your CGI script.
Following the instructions in the previous sections if necessary, add an ActiveX command button directly below the </FORM> tag. The only property you need to change is its caption; set it to something like Add your Link.
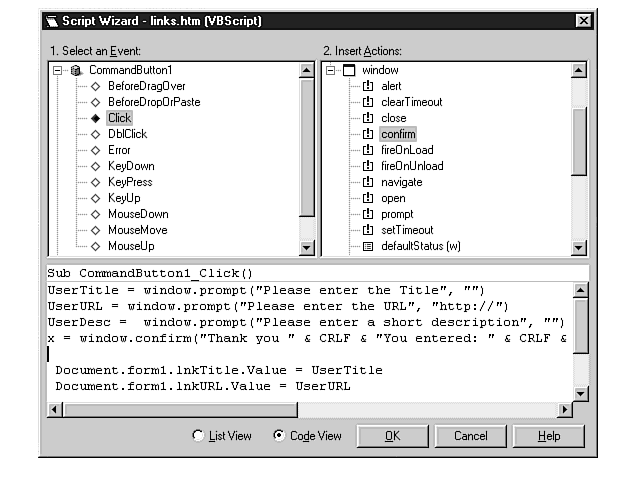
Launch the Script Wizard and perform the following steps:
Figure 3.13: The almost completed script in the Script Wizard.
| Tip |
Inserting ASCII or ANSI characters into strings using the Chr(n) VBScript function is an easy way to include non-standard characters such as copyright or trademark logos into standard text strings. See the ASCII character set in Appendix F, "The ASCII Character Set." |
Save the HTML file as links.htm. It should look something
like what you see in
Figure 3.14.
Figure 3.14: links.htm in the ActiveX Control Pad.
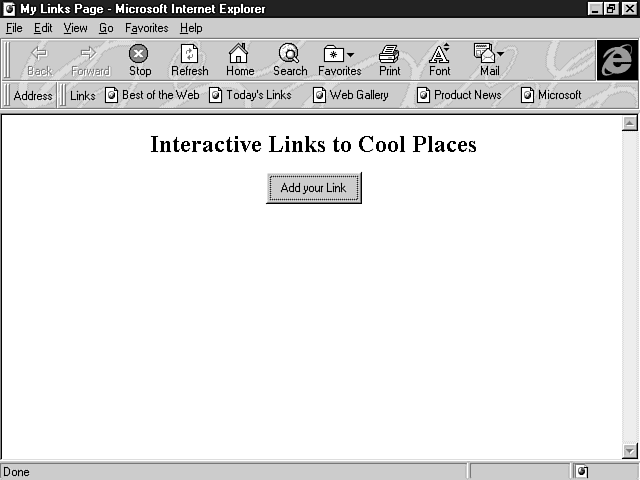
Run the page with your browser (see Figure 3.15) and click the Add your Link button. What follows is a series of Prompt input dialog boxes in which you enter information about the link you want to add to the page, as shown in Figures 3.15 through 3.18.
Figure 3.15: links.htm in Internet Explorer.
Figure 3.16 shows the first Prompt dialog asking for the title of the link. Enter a title and click OK.
Figure 3.16: When the user clicks the button, a series of Prompt input dialogs is displayed.
Now you are asked for the URL of the link, as shown in Figure 3.17. Again, enter the required details and click OK.
Figure 3.17: Each time the user clicks OK, a new dialog appears.
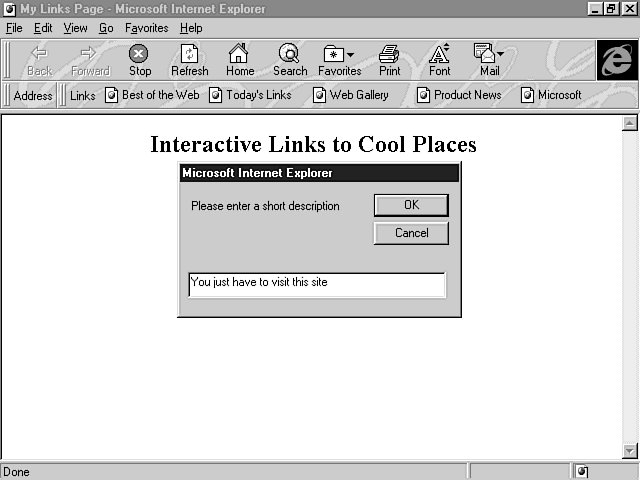
Finally, you are asked to input a short description for the site, as shown in Figure 3.18.
Figure 3.18: The last input requested is a site description.
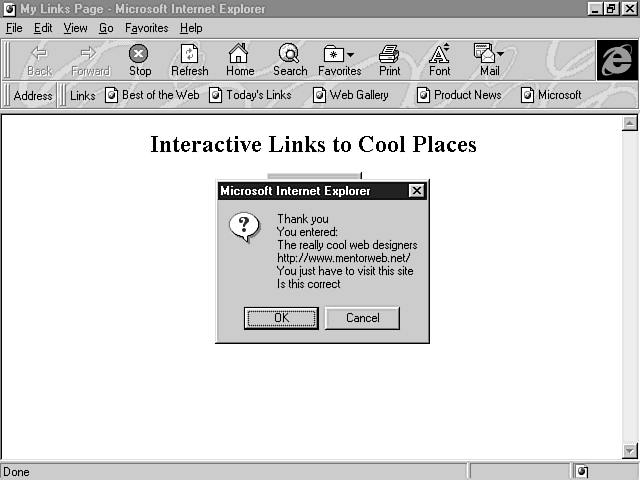
A Confirm dialog is used to display the details you have input (as shown in Figure 3.19), and it asks you to confirm whether the details are correct. What you don't have with this example is a decision-making process based on the user's response to the final confirmation, such as what to do if the user says "No."
Figure 3.19: Finally, a Confirm dialog displays.
As you have seen, Prompt dialogs allow you to collect data from the user and then process that data. In certain situations, using the Prompt dialog provides a neat and tidy alternative to using the normal text box and Submit button. This method is especially useful if it is triggered from a text hyperlink to solicit a user's e-mail address for automatically sending information.
However, you should be aware of the limitations of the Prompt dialog box. First, it cannot accommodate checkboxes and options; it only displays a single-line text box. Second, it tends to contradict the now accepted nonlinear theory of Windows input. For example, in a normal form with four text boxes, the order in which you enter data is immaterial. It doesn't matter if you enter data in the fourth box first and then complete the first text box, and so on. Furthermore, if you want to edit data entered into a normal form, you can move directly to the data in the text box that needs editing; you don't have to go through all of the pop-up dialog boxes to get to the offending item. As you can see, when you use pop-up dialog boxes to enter information, you fix the order in which the user inputs the data. (First, show box one, then box two, and so on.) If the user wants to edit one of the data fields, either you provide a second level of choice (which one do you need to edit?) or the user must move through all the dialog boxes sequentially until he finds the one to edit. For these reasons, I recommend that you use Prompt input dialogs sparingly and only for inputs of a few data fields.
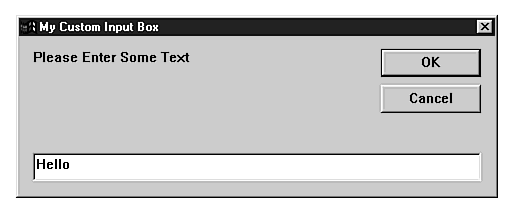
Earlier in the chapter, you saw the MsgBox function, which enables you to create a custom message box for the user. VBScript provides a comparable customizable function for collecting data called InputBox.
The Prompt method provides you with a neat dialog box for gathering data, but the alternate VBScript function, InputBox, allows you to use your own title for the dialog and position the dialog anywhere on the page.
As you're about to see, the InputBox dialog is somewhat larger on the screen than the one provided by Prompt. Look at a quick example using the InputBox function.
This time, you're not going to use any ActiveX controls. You use only the normal HTML controls, and all the work is done within the text editor of the ActiveX Control Pad.
First, open the ActiveX Control Pad and work on the HTML template provided. Enter the following to set up the HTML code:
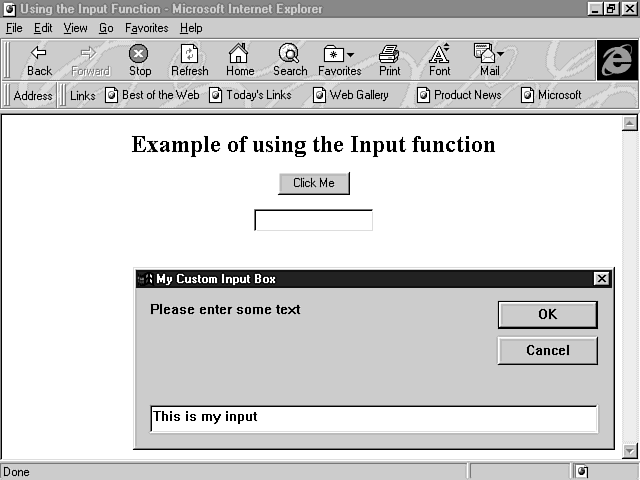
<HTML>
<HEAD>
<TITLE>Using the Input Function</TITLE>
<BODY BGCOLOR="white">
<CENTER>
<H2>Example of using the Input function</H2>
<P>
<FORM NAME="Form1">
 <INPUT TYPE="button" NAME="CommandButton1" VALUE="Click Me"><P>
 <INPUT TYPE="text" NAME="TextBox1">
</FORM>
</CENTER>
</BODY>
</HTML>
Directly under the <TITLE> line, clear a space and type the following VBScript code:
<SCRIPT LANGUAGE="vbscript">
<!--
 Sub CommandButton1_OnClick
   strUserInput = InputBox("Please enter some text","My Custom Input Box",
"",2000,4000)
   Document.Form1.TextBox1.Value = strUserInput
 End Sub
-->
</SCRIPT>
I opted to show you the VBScript code in this way, rather than use the Script Wizard, to demonstrate that you have several ways to add script to a page. Had you used the Script Wizard with an HTML control, as you saw in the previous chapter, all the code would have appeared in a single, almost illegible, line in the button's own HTML definition. The preceding method makes things much easier to read and debug.
The syntax for InputBox follows:
returnvalue = InputBox("Message","Title","Default Text",XPos,YPos)
This code line is fairly self explanatory except for XPos and YPos, and you might be wondering why I set these at 2000 and 4000, respectively. XPos is the position that the left edge of the dialog takes in relation to the left edge of the screen. YPos similarly measures the distance from the top of the dialog box to the top of the screen. The reason these values are so large is that InputBox, having joined the Web recently from a long-running engagement in Visual Basic, still works in twips. "Ah," I can hear you say, "That explains it…NOT." A standard 640¥480 pixel setup has about 15 twips per pixel in both the x and y planes.
| Note |
Many Windows programming languages use twips as a measurement. The Microsoft Visual Basic help file topic says that a twip is "a unit of screen measurement equal to 1/20 of a printer's point. There are approximately 1440 twips to a logical inch or 567 twips to a logical centimeter, the length of a screen item measuring one inch or one centimeter when printed. A twip is a screen-independent unit used to ensure that placement and proportion of screen elements in your screen application are the same on all display systems." I couldn't have put it better myself! Unfortunately, because the twip is independent of the screen's pixel coordinate system, there is no set calculation of twips to pixels. |
Save the file as inputbox.htm and run it with the browser, as shown in Figure 3.20.
Figure 3.20: The InputBox example.
The final part of this chapter on communicating with the user deals with that small, unobtrusive bar at the bottom of the browser called a status bar. The status bar is where the browser tells you that the filename of the link you passed over is "Shortcut to http://..." and where many sites display the moving JavaScript messages that you either love or hate (I'm saying nothing).
To create a simple message in the status window when the mouse passes over a hyperlink, all you do is build your hyperlink as follows:
<A HREF="" LANGUAGE="VBScript" OnMouseOver=
"Window.Status='This takes you anywhere'">Any Link</A>
This code uses the OnMouseOver event, which fires whenever the mouse passes over the link.
This event calls the Status method of the window object and passes the string "This takes you anywhere". Note that the definition of the method must be surrounded by double quotes; if you need to use quotes inside the definition, you must use single quotes.
One limitation of changing the status bar is that there isn't a OnMouseGoneAway event to reset the status bar. Even when the mouse leaves the hyperlink, the text you placed in the status bar remains.
Finding new ways to communicate with others is what brought the Web into being. In this chapter, you saw how using a few simple built-in methods can improve the way your Web pages communicate with the users of your Web site.
Whether you use the built-in methods or the customizable VBScript functions, you can quickly and easily add dialog boxes that help visitors use your site in ways that are familiar to them. This familiarity speeds up the learning process that we all face when we visit a site for the first time.
You've just seen VBScript in action doing some real work. To see some other neat things that you can achieve with VBScript, take a look at the following chapters:
| Q: | Is there a way to display a small browser window containing an HTML file with an input form, instead of an input or prompt dialog box? |
| A: | Yes, you use the browser window's Open method to create a new window, and load an HTML file into that window. You can control the size of the window and its features such as menu bar, tool bar, and so on. You can see this in action in Chapter 18, "Interacting with the Browser." |
| Q: | Why are there so many ways to achieve the same result-for example, two types of input dialog boxes and three types of output dialog boxes? |
| A: | You'll find with most programming languages that have evolved over a long period of time that many functions and methods appear to (and in many cases do) replicate others within the language. One reason for this is that new functions and methods are added to the language to enhance the functionality of the old functions and methods, but because many programs (and programmers) rely on the old functions and methods, they can't be removed. However, this particular case is not an identical duplication because MsgBox and InputBox give greater flexiblity than Alert, Confirm, and Prompt. In this case, the duplication occurs because VBScript has built-in functions for MsgBox and InputBox, which have to be included in the language engine. Plus, VBScript must adhere to the Active Scripting Object Model, which specifies that the window object must have Alert, Confirm, and Prompt methods. |


